Although I enjoyed a formal education in physics, I never really understood electronics. I know the basic laws, and I can solve all standard textbook problems, but I never got so far that I could have solved real problems. On the other hand I never did much lab work where I had needed it.
Electronics was on the list of things that I want to know but not learn. This list is quite long and gets longer and longer, because knowing rarely happens without learning. However when I built my Prusa, I found that I really enjoyed soldering and that I did not have the slightest understanding of what my RAMPS electronics did. This moved electronics on the list of things that I want to know and want to learn. I also have some exciting ideas that I want to try (but with a very high probability they are not good ideas because I knew nothing about electronics when I had them), and excitement helps with learning.
So I started my adventures in electronics by buying a Fritzing Starter Kit. Fritzing is a very nice software for designing circuits. The software is well integrated with an online community and a PCB fabbing service, which might be handy in the future. I have to stress again that the software is very usable (this is probably due to the fact that it was developed by interaction design experts). It is built around three different perspectives on the circuit (Breadboard View, Schematic and PCB View), and automatically translates between them. I really like that approach.
The Starter Kit comes with an Arduino, so you can also do some programming to replace electronics. After I had played around with some of the examples, I decided to build a loop sequencer, which turned out to be essentially a software project.
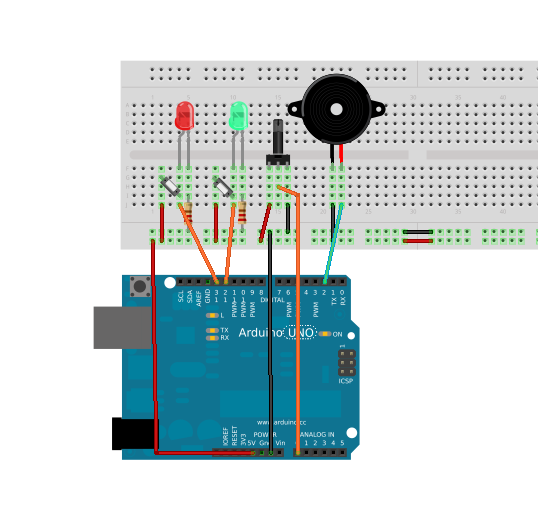
Breadboard view of my loop sequencer.
To make sounds (I didn't manage to make music with it):
- First you have to choose the loop length by turning the poti. The begin of the loop is indicated by a click of the buzzer. - When you are satisfied with the loop length, you have to confirm your choice by pressing the confirm button. The green LED should light. - Now you are in recording mode. Pressing and holding the input button sets start and duration of the tone. The red LED indicates the recording. Attention, if the button is hold past the end of the loop, the tone is discarded. The poti can be used to set the pitch. If you are not satisfied with pitch or timing, pressing and holding the button again overwrites. - Once you are satisfied with the tone, you can confirm it with the confirm button. The green LED should light. Now you are ready to record the next tone. - Repeat this procedure up to ten times. Afterwards the first tones get overwritten. - Happy sampling!
You can find the fritzing sketch and the arduino code here.